How to Set Up Part Counting on a Fanuc CNC Controller
By Jordan Cota
Accurate part counts are essential for production tracking, tool life management, and knowing when a batch is complete. Fanuc controllers offer several ways to count parts, from built-in M code triggers to custom macro variables. This guide covers all three methods and explains how to handle the common scenario where a single program cycle produces two, three, or more finished parts.
Note: The macro variable method (#3901) requires the Macro B option to be enabled on the controller. Most modern Fanuc controllers (0i-D and newer) include this as standard, but some older machines or budget configurations may not have it.
1. Part Counting Methods Overview
There are three common approaches to counting parts on a Fanuc CNC. Which one you use depends on how your programs are structured and whether your fixture produces more than one part per cycle.
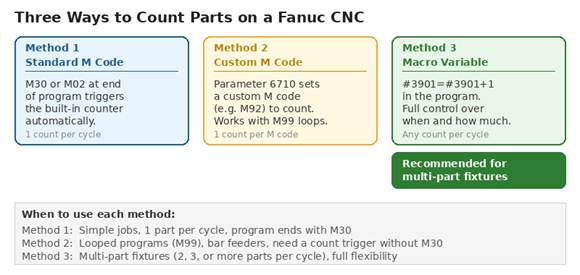
Figure 1: Three methods for counting parts on Fanuc controllers
The standard M30/M02 approach works fine for simple programs that make one part and end. But it falls apart in two common scenarios: programs that loop with M99 (like bar feeders), and multi-part fixtures where one cycle produces 2, 3, or more finished parts. For these situations, you need either a custom M code or a macro variable.
2. Method 1: Standard M Code Counting (M30/M02)
By default, most Fanuc controllers increment the part counter by 1 each time the program hits an M30 (program end and rewind) or M02 (program end). This behavior is controlled by parameters 6700 and 6710.
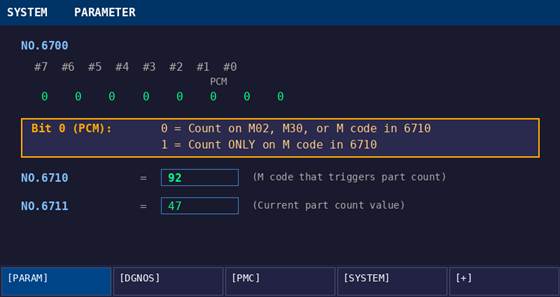
Figure 2: Parameter 6700 and 6710 control which M codes trigger the count
How to Check Your Current Configuration
- Put the machine in MDI mode
- Press the [SYSTEM] hard key, then [PARAM]
- Navigate to Parameter 6700
- Check Bit 0 (PCM), the rightmost bit
| Parameter | Value | Behavior |
| 6700 Bit 0 (PCM) | 0 | Count on M02, M30, or the M code in Param 6710 |
| 6700 Bit 0 (PCM) | 1 | Count ONLY on the M code specified in Param 6710 |
| 6710 | 0 (default) | No custom M code assigned |
| 6710 | 92 (example) | M92 triggers a part count increment |
| 6711 | (read only) | Displays the current part count value |
Note: Parameter 6710 can be set to any M code except M98 and M99. Common choices are M92, M55, M89, or any other unused M code on your machine. Check with your machine tool builder before assigning one to make sure it is not already in use.
Testing the Count
To quickly verify your count is working, go to MDI mode and run the M code you expect to trigger the counter (M30, M02, or your custom code from 6710). Press Cycle Start and check whether the part count on the display increments. If you do not see a count on screen, check Parameter 6711 directly for the stored value.
3. Method 2: Custom M Code for Looped Programs
If your programs loop using M99 instead of ending with M30, the standard counter will never trigger. M99 tells the controller to jump back to the beginning of the program without resetting, so the part count never increments.
The fix is to assign a custom M code in Parameter 6710 and place it in your program before the M99. For example:
(… machining code …)
M92 ; (triggers part count via Param 6710)
M99 ; (loop back to start)
To set this up:
- Enable Parameter Write (PWE = 1) on the SETTING screen
- Navigate to Parameter 6700 and set Bit 0 to 1 (count only on custom M code)
- Set Parameter 6710 to your chosen M code number (e.g., 92)
- Add that M code to your program before the M99 line
- Power cycle the controller if required (some machines need it for parameter changes)
Setting 6700 Bit 0 to 1 is important here. Without it, the count might still trigger on M30 or M02 from other programs running on the machine, which can cause double counting or inaccurate totals.
Note: This method still counts 1 per trigger. If your fixture makes multiple parts per cycle, you need Method 3.
4. Method 3: Macro Variable for Multi-Part Fixtures
This is the most flexible method and the one you want when a single program cycle produces 2, 3, or more finished parts. Instead of relying on M codes, you write directly to the Fanuc system variable that stores the part count.
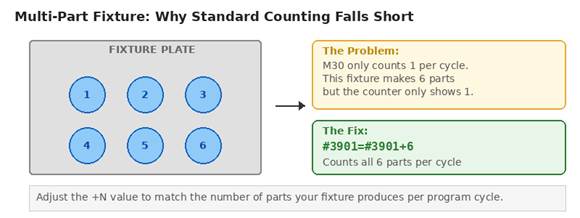
Figure 3: Why standard counting does not work for multi-part fixtures
The System Variables
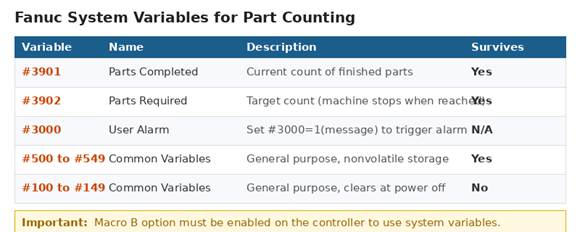
Figure 4: Fanuc system variables used for part counting
The two key variables are #3901 (parts completed) and #3902 (parts required / target). These are the same values displayed on the Work Counter screen. Writing to #3901 directly updates the counter the operator sees.
Basic Example: 1 Part Per Cycle
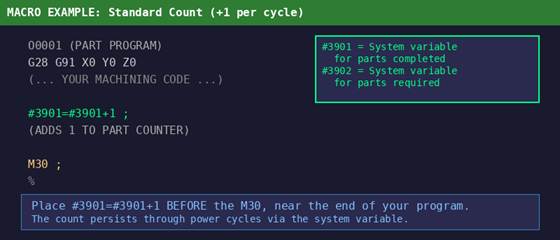
Figure 5: Simple macro to add 1 to the part counter per cycle
This is functionally the same as counting on M30, but gives you explicit control. The line #3901=#3901+1 takes the current count, adds 1, and writes it back. Place it near the end of your program, before M30 or M99.
Multi-Part Example: 2 or 3 Parts Per Cycle
This is where the macro approach pays off. If your fixture holds 2 parts and both are machined in a single program cycle, change the +1 to +2. If it holds 3, use +3. The principle is the same regardless of the number.
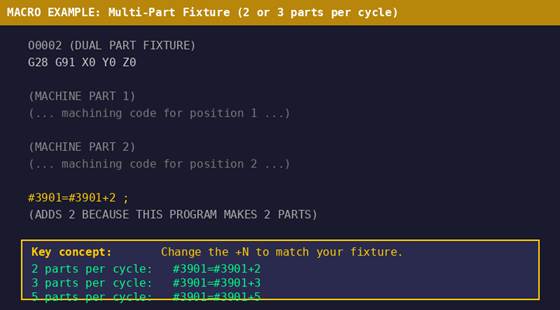
Figure 6: Macro adjusted to count 2 parts per program cycle
Because M30 also adds 1 to the counter by default, you need to account for this to avoid double counting. There are two options:
- Option A: Disable M30 counting. Set Parameter 6700 Bit 0 to 1 and leave Parameter 6710 at 0 (no custom M code). This way only the macro line counts, and M30 does nothing to the counter.
- Option B: Subtract 1 from the macro. If you want to keep M30 counting enabled for other programs, use #3901=#3901+1 instead of +2 (since M30 will add the other 1). This is messier and harder to maintain across programs, so Option A is the cleaner approach.
Note: If your count is consistently 1 higher than expected, M30 is double counting on top of your macro. Set Parameter 6700 Bit 0 to 1 to fix it.
5. Combining Macros with M99 Loops
Bar feed machines and other continuous production setups typically loop with M99 and never hit M30 until the bar runs out or the target count is reached. Here is how to build a self-stopping counter into a looped program.
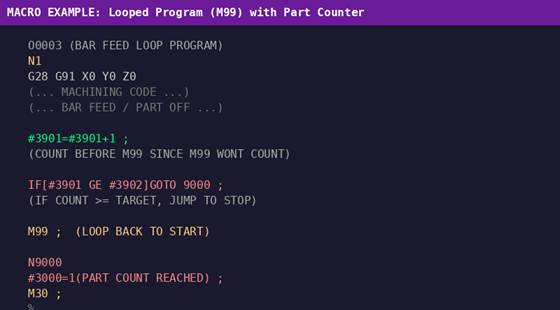
Figure 7: Looped program with macro counter and automatic stop at target
In this example, the program increments #3901 by 1 after each part, then checks if the count has reached the target stored in #3902. When the count meets or exceeds the target, the program jumps to N9000, triggers a user alarm (#3000=1), and ends with M30. Until then, M99 sends it back to the start for the next part.
To set the target, the operator enters the desired number into variable #3902 before starting the run. This can be done on the Macro variable screen ([SYSTEM] > [MACRO] > navigate to variable 3902) or on the Work Counter page if the machine has one.
Multi-Part Version
For a looped program where each cycle makes 2 parts (for example, a twin spindle lathe), simply change the increment:
#3901=#3901+2 ;
(ADDS 2 BECAUSE EACH CYCLE MAKES 2 PARTS)
IF[#3901 GE #3902]GOTO 9000 ;
The IF/GOTO logic still works the same way. Just be aware that if the target in #3902 is not evenly divisible by your increment, the final count will overshoot slightly. For example, a target of 25 with +2 per cycle will end at 26. If precise counts matter, adjust the target accordingly or add rounding logic.
6. Viewing and Resetting the Part Count
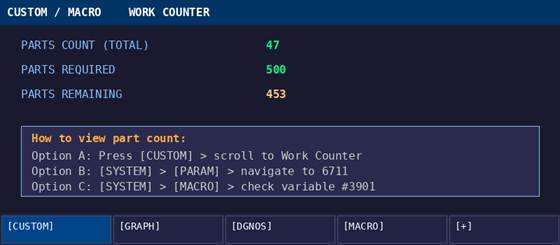
Figure 8: Three ways to check the current part count on the controller
Viewing the Count
There are a few places to see the current count depending on what your machine tool builder has set up:
- Work Counter screen: Press [CUSTOM], then use the right arrow key to find the Work Counter or Condition page. Not all machines have this; it depends on the builder.
- Parameter 6711: Go to [SYSTEM] > [PARAM] and navigate to 6711. This always shows the current count value.
- Macro variable screen: Go to [SYSTEM] > [MACRO] and look up variable #3901. This shows the same value and lets you edit it directly.
Resetting the Count
To reset the part count to zero, you have three options:
- From the Work Counter screen: If available, set the Count field to 0.
- From the Macro screen: Navigate to #3901 and type 0, then press [INPUT].
- From within a program: Add #3901=0 at the beginning of your program. Use this with caution since it resets the count every time the program starts, which is usually not what you want unless paired with a conditional check.
7. Troubleshooting
| Problem | Likely Cause | Fix |
| Count not incrementing at all | PWE not enabled, or no M code / macro in program | Check PWE = 1 on SETTING screen; verify program has #3901 line or correct M code |
| Double counting (count goes up by 2 when expecting 1) | Both macro (#3901+1) and M30 are counting | Set Parameter 6700 Bit 0 to 1 to disable M30 counting |
| Count resets to 0 on power cycle | Using volatile variables (#100 to #149) instead of #3901 | Use system variable #3901 which persists through power off |
| #3901 not recognized / alarm | Macro B option not enabled on controller | Contact machine builder or Fanuc to enable the Macro B option |
| Count works but machine does not stop at target | Ladder program does not check #3902, or no IF/GOTO logic in program | Add IF[#3901 GE #3902]GOTO with alarm, or ask builder to configure auto-stop |
| M99 loop never counts | No custom M code or macro before the M99 line | Add #3901=#3901+N or a custom M code (Param 6710) before M99 |
| Count is off by 1 on multi-part fixture | M30 adding 1 on top of macro count | Disable M30 counting (Param 6700 Bit 0 = 1) or adjust +N value |
8. Quick Reference
| Scenario | Recommended Approach | Code to Add |
| 1 part per cycle, program ends with M30 | Standard (no changes needed) | None (M30 counts by default) |
| 1 part per cycle, program loops with M99 | Custom M code or Macro | #3901=#3901+1 before M99 |
| 2 parts per cycle (dual fixture) | Macro variable | #3901=#3901+2 before M30/M99 |
| 3 parts per cycle (triple fixture) | Macro variable | #3901=#3901+3 before M30/M99 |
| N parts per cycle | Macro variable | #3901=#3901+N before M30/M99 |
| Auto-stop at target count | Macro with IF/GOTO | IF[#3901 GE #3902]GOTO 9000 |
Note: When using the macro approach for multi-part counting, always set Parameter 6700 Bit 0 to 1 to prevent M30 from adding an extra count on top of your macro.
9. Connect to Glassdome for Automated Part Tracking
Once your part count is configured correctly on the controller, you can feed that data directly into Glassdome for real-time production monitoring. Glassdome reads the part count via FOCAS2 (system variable #3901) over your network connection, so the count displayed on the controller is exactly what appears in your dashboards.
This means you get live part counts, automatic cycle time calculations, and production vs. target tracking without any manual data entry. When a multi-part fixture completes a cycle and the macro adds +2 or +3 to the counter, Glassdome picks up that change immediately.
Learn more: Visit glassdome.com to see how Glassdome Production Monitoring integrates with Fanuc CNC controllers for real-time shop floor visibility.
Need Help with IP settings on Fanuc CNCs: https://glassdome.com/need-to-configure-a-static-ip-on-a-fanuc-cnc-controller-this-step-by-step-guide-covers-the-complete-setup-process-across-the-0i-tf-pf-30i-31i-32i-and-16i-18i-21i-controller-series-learn-how-to-nav/
Conclusion
For simple one-part programs that end with M30, the default counter works without any changes. For everything else, the macro variable approach using #3901 gives you the most control. It handles M99 loops, multi-part fixtures, and custom stop logic all with a single line of code. The key thing to remember is that #3901=#3901+N is your universal tool for part counting on Fanuc, where N is the number of parts your program produces per cycle. Pair it with Parameter 6700 Bit 0 set to 1 so M30 does not double count, and you have a reliable setup that works across any production scenario.
Ready to start finding and using the hidden data in your machines?
Talk with a Glassdome manufacturing expert today